Monday, October 29, 2012

Peek in on the TableMaking class...


The Table Making class just ended and there were some pretty special pieces built. One of the things I love about teaching is encouraging people to build whatever it is they want . Classes where everyone build the exact same piece seems like the teacher is being a bit lazy to me - what, you can't keep everyone's details straight in your head? 

While not everyone finished their tables, I still think this class was a great success. 

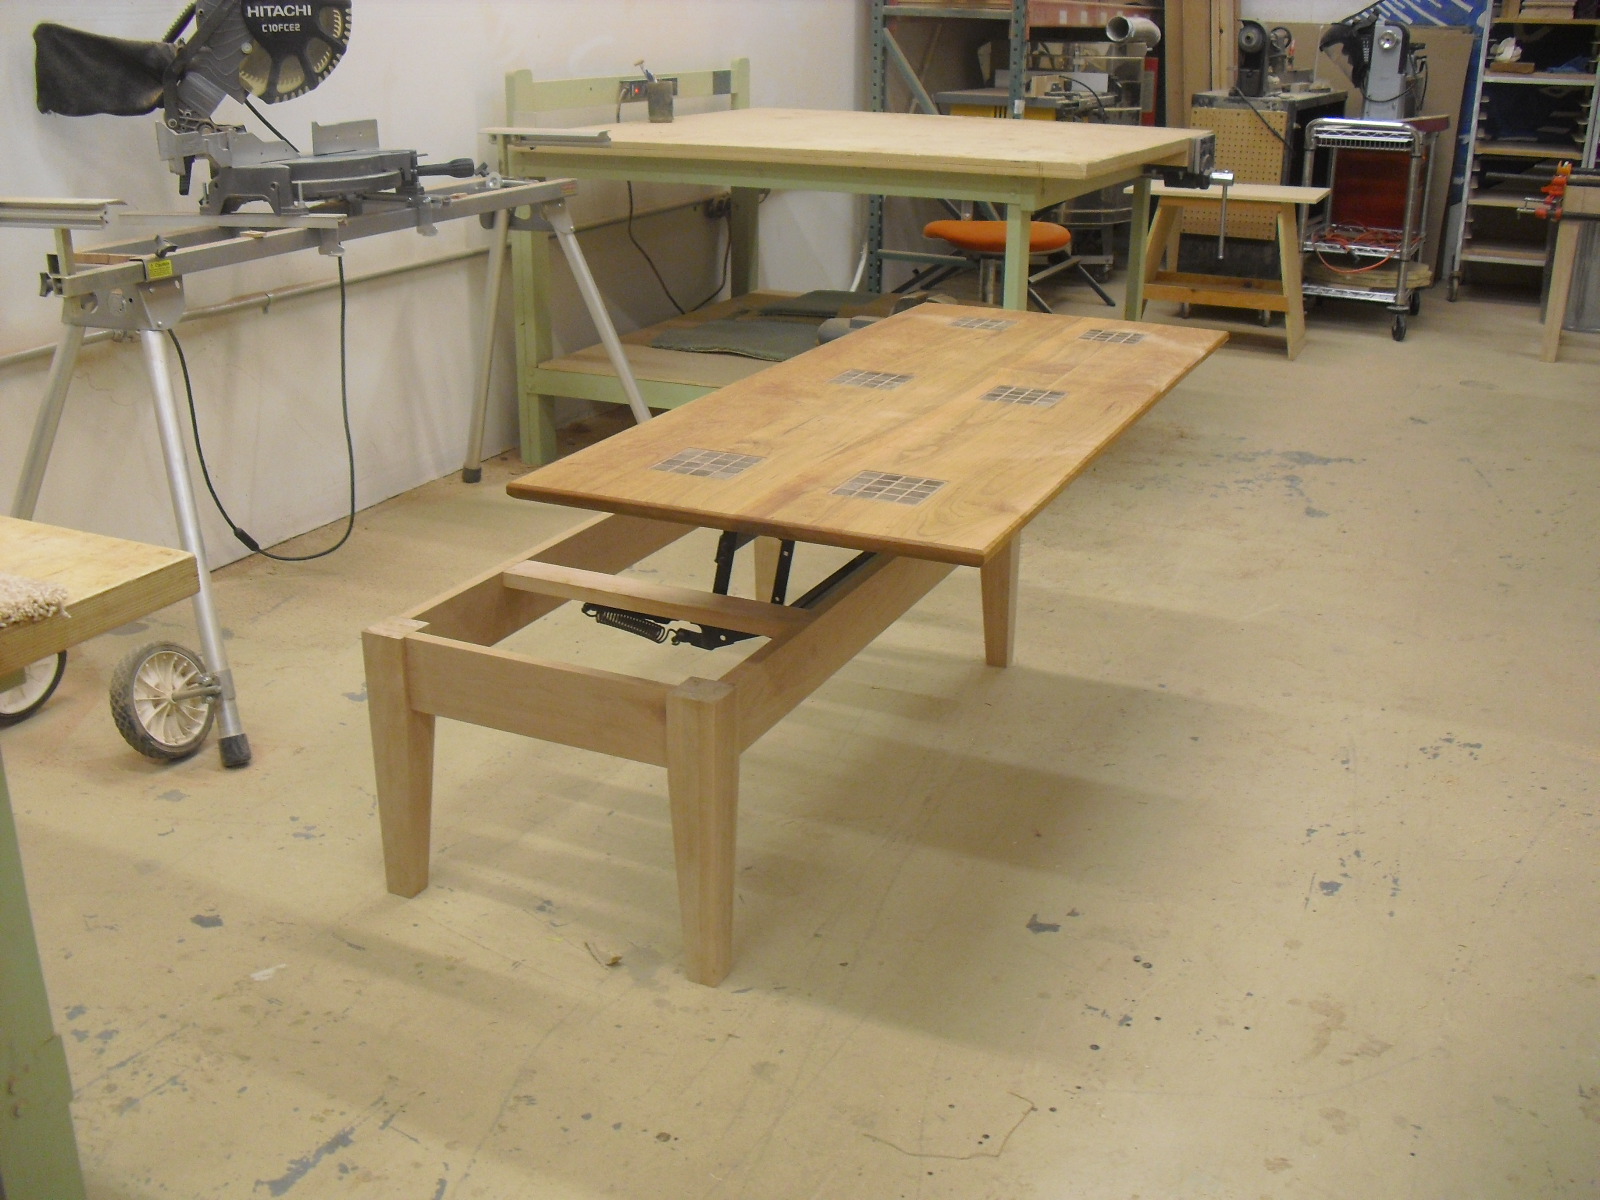
This table featured six separate inlaid tile areas.


You would probably be surprised to see how much work goes into inlaying tile, so creating six different areas is a feat in itself!


This table has a lift mechanism in it, so it can be used at coffee table height


to "dinner at the coffee table" height.


Check it out. 


I forgot to get a picture of this table when it was finished, but this was the first piece of furniture that this student ever built. It was designed to be a crafting table for his wife - smart guy! One way to enroll in future classes is to build piece for other people!


He eventually painted the legs on this table a rich hunter green, it had quite the "Crate and Barrel" look. And it was amazingly stable and sturdy. His wife is going to love it. Nice work!


Again - I screwed up (what's my problem?) and didn't get a finished shot of this Redwood table. But - it was fantastic! It featured massive mortise and tenons, and a shallow magazine rack in the trestle area. 


It was built to match this Adirondack chair he made in a previous class. Terrific work. 


A few students undertook complex designs, with drawers, shelves, or odd joinery. They knew they probably wouldn't finish their tables in the allotted six sessions, but that didn't stop them.  

This computer table will have a low shelf underneath it, and will hold three printers. Drawers will pull out from each end of the table - try finding a table like this in your local furniture store!


This isn't even a table - but rather - a big barstool. The aprons were Dominoe-d into the legs at 45˚ angles, and there is a long slot in each apron, where leather will be woven, to hold the cushion. This student has a ton of creativity and a sketchbook full of ideas - I love that!


Here's another proud moment in the class - posing with your finished table. 


Check out the grain management on the top - she created a book matched top using two different woods.


This was on Facebook before the oil was dry!


One of the important rules about building furniture is to make sure that you can get the piece inside your house! Or in this case - that you can lift it! 

This BEEFY Hickory table was so heavy, I had to take a picture of it in the bed of this student's truck, instead of having him bring it back into the shop. It reminded me of an old cowboy furniture design I'd seen years ago - with posts and beams, all massive and designed to last a lifetime. One of his grandchildren will probably have this table someday - what a cool thing to pass down. 


One of the great things about teaching is that I get to meet some amazing people, and this student is one of those! I'm in the process of re-vamping my website, and he's been helping me redesign and tweak it. It's not finished yet, but he's come up with some really nice changes and improvements for it, and I'm excited. If you're in need of any website work - I'd be happy to put you in touch with him. You won't find a more creative or easy-to-work-with web person out there!

Although he's fairly handy with tools, he'd never built a table before this one. It was solid Cherry, designed to be a small laptop desk in the guest room at his new home. 


Here he's attaching the top. 


I'd like to thank everyone for making this such a nice class. There was a very nice vibe in the class - everyone worked well together, lending a hand when something heavy needed flipped or lifted. Even better - people in this class were quick to give positive comment or suggestion.


Next week starts another round of classes - this time we'll be building Bookcases. (There are still a few spots, if you're interested in signing up.)

I hope you enjoyed reading about this class as much as I did teaching it!

Thursday, October 25, 2012

Putting it all together

Working with this Aromatic Cedar is just about killing me - it's kicked up my allergies or I'm getting a cold - or something. The last time I worked with a piece of wood that I had a reaction to - I was diagnosed with epiglottitis - and trust me, that sucked big time. 

So - I'm feeling miserable, but it's time to get finish this piece! 

There wasn't much left to do - make the center stretcher and then tie it all together. The stretcher was about three feet long, so boring holes in it on the drill press wasn't an option. 

There's more than one way to drill a long piece!


KD (that stands for knock-down) fittings seemed appropriate here - in case this piece has to be disassembled some day. 


Placing everything on the table saw upside down is an easy way to bolt it together.


These long bolts will eventually be hidden behind some wooden plugs.


When using KD fittings, you usually use a dowel bolt, 


but I didn't have any that were large enough. Dowel bolts work best when clamping against a rounded surface like this hole. 


The next best thing is to bend the washers


so that they conform to that curve. 

I've done this a time or two. It works like a charm.


With the stretcher in place, it's time to add one last detail.


Along it's length, I added some FIgure-8 tabletop fasteners. Those will allow me to connect the stretcher to the tabletop in a few more places. 


FInally - the base is complete!


Everything was flipped upside down and bolted together. 


Don't you think the black hardware looks much nicer than seeing zinc coated metal? Well, the hardware is completely hidden on the underside of this table, so it's not like anyone will see it. You'd have to climb underneath the table to look at it. 

Still - I'd know it's there, so I want it to look nice. 


And suddenly - the table is done!


Hope you enjoyed watching this table go together. 

Now it's time to turn my attention to making something else - here are the plans.


Tuesday, October 23, 2012

Time to make the hardware!


Hot damn, I'm almost done!

I found some beefy aluminum bar stock, and cut four lengths of it, in order to make some  mounting brackets. I've used this method a few times before, and really like the unobtrusive way that these look.


The brackets required some drilling


to accomodate the mounting screws.


The bars needed some TLC, they were a little scuffed.


Here I'm trying to lay out a few more holes; 


I marked them, and dug out some appropriate bits -


then spent a little quality time with my drill press. 


These came out exactly as planned. 


After a little more sanding, I shot them with some flat black paint. I think there are a few different camps in the "hardware color" field - and I'm definitely a fan of black hardware, as opposed to brass or nickel. 


Then I predrilled the wooden base sides and temporarily attached them to the base. A line, scribed on each side of the bracket with a utility knife, 


 marked the area that needed to be removed. I routed away most of the waste, and then cleaned up everything with a chisel. You can see the line I scribed here.


Now the bracket sits flush. Sweet.


I don't have much more work to do - attach a center stretcher and a little more sanding and this table will be complete. Delivery is always one of the best parts of building!


Saturday, October 20, 2012

Albuterol and Ralph Waldo Emerson - try tying those together in a normal woodworking conversation!

Every now and then, I'll have a reaction to a wood I'm using - and in this case - working with this Aromatic Cedar has proven a challenge. I'm just happy I have a good supply of Albuterol.


The side effects are often worse than the benefits. Imagine drinking 20 cups of coffee before trying to go to sleep. 


Usually - the most common things woodworkers have to deal with are splinters or sore backs. But trust me - breathing issues are just as bad. 

I planed the sides of this table base 


and trimmed them to length.


But there were some cracks that worried me.


I pulled out the butterfly template and decided to add a few to the base, to stop the advancing splits.


Thank God for plunge routers!


 Part of the challenge while designing a piece of furniture is coming up with hardware that fits the piece. These beefy sides are going to need hardware that won't be readily available. So my next step will be to design and make something. 

A favorite quote of mine by Ralph Waldo Emerson  - 

"Men admire the man who can organize their wishes and thoughts in stone and wood and steel and brass"

seems particularly appropriate right now, although I'd like to substitute "woman" for "man" in the first line!